Hi Lois,
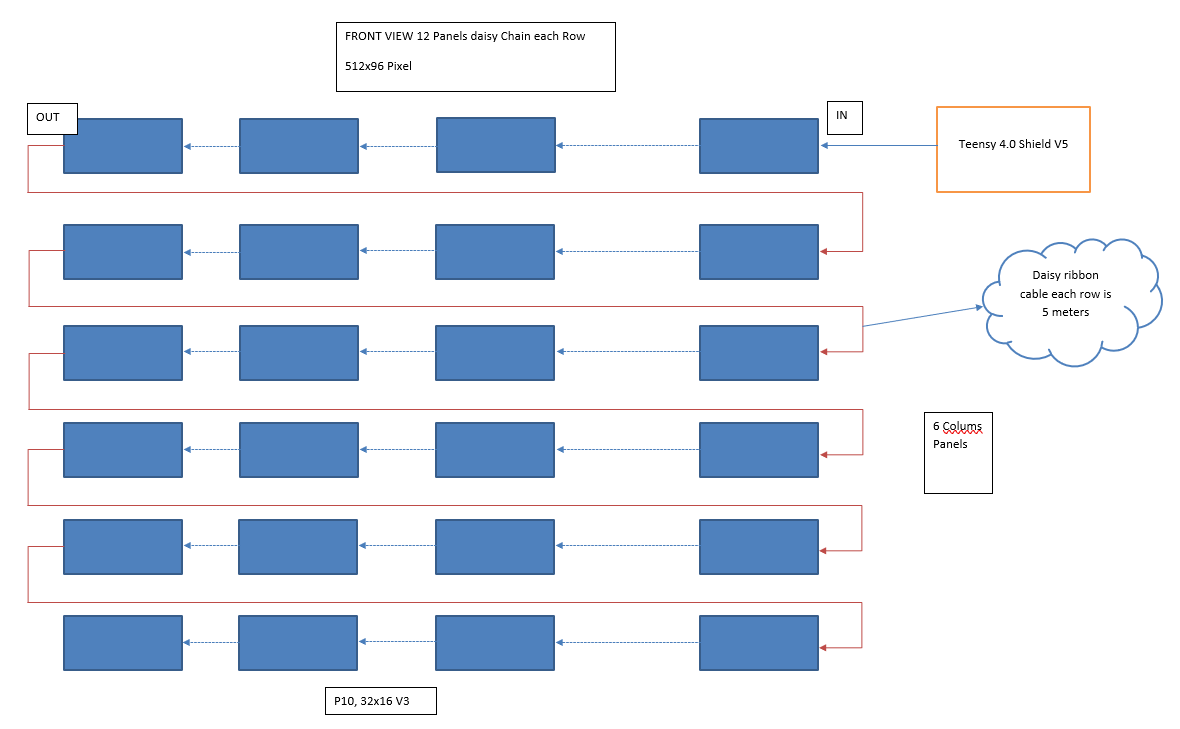
Your smartmatrix library is awesome. Currently, i’m testing wide panel P10 16x32 V3 with 512x96 pixel and the total daisy chain is 96 panels in single series.
The main controller using teensy 4.0 shield V5. please see wiring figure as below:
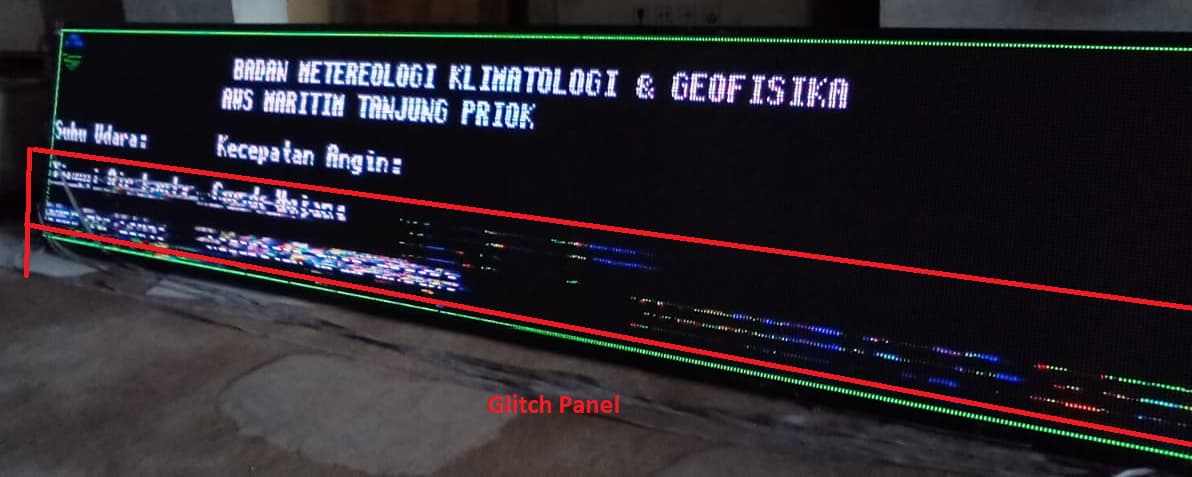
Writing string to row 1st panel to 3rd panel is good, however for 4th row panels to was corrupt and distorted like a shadows. Is it caused by long daisy chain ribbon wire? can you advice my problem.
#include <ArduinoJson.h>
#define USE_ADAFRUIT_GFX_LAYERS

#include <MatrixHardware_Teensy4_ShieldV5.h>        // SmartLED Shield for Teensy 4 (V5)
#include <SmartMatrix.h>
//#include "FreeSerifItalic24pt7b.h"

#define COLOR_DEPTH 24                  // Choose the color depth used for storing pixels in the layers: 24 or 48 (24 is good for most sketches - If the sketch uses type `rgb24` directly, COLOR_DEPTH must be 24)
const uint16_t kMatrixWidth = 512;       // Set to the width of your display, must be a multiple of 8
const uint16_t kMatrixHeight = 96;      // Set to the height of your display
const uint8_t kRefreshDepth = 24;       // Tradeoff of color quality vs refresh rate, max brightness, and RAM usage.  36 is typically good, drop down to 24 if you need to.  On Teensy, multiples of 3, up to 48: 3, 6, 9, 12, 15, 18, 21, 24, 27, 30, 33, 36, 39, 42, 45, 48.  On ESP32: 24, 36, 48
const uint8_t kDmaBufferRows = 4;       // known working: 2-4, use 2 to save RAM, more to keep from dropping frames and automatically lowering refresh rate.  (This isn't used on ESP32, leave as default)
const uint8_t kPanelType = SM_PANELTYPE_HUB75_16ROW_32COL_MOD4SCAN_V3;   // Choose the configuration that matches your panels.  See more details in MatrixCommonHub75.h and the docs: https://github.com/pixelmatix/SmartMatrix/wiki
const uint32_t kMatrixOptions = (SM_HUB75_OPTIONS_NONE);        // see docs for options: https://github.com/pixelmatix/SmartMatrix/wiki
const uint8_t kBackgroundLayerOptions = (SM_BACKGROUND_OPTIONS_NONE);
const uint8_t kScrollingLayerOptions = (SM_SCROLLING_OPTIONS_NONE);
const uint8_t kIndexedLayerOptions = (SM_INDEXED_OPTIONS_NONE);

SMARTMATRIX_ALLOCATE_BUFFERS(matrix, kMatrixWidth, kMatrixHeight, kRefreshDepth, kDmaBufferRows, kPanelType, kMatrixOptions);

SMARTMATRIX_ALLOCATE_BACKGROUND_LAYER(backgroundLayer, kMatrixWidth, kMatrixHeight, COLOR_DEPTH, kBackgroundLayerOptions);

#ifdef USE_ADAFRUIT_GFX_LAYERS
// there's not enough allocated memory to hold the long strings used by this sketch by default, this increases the memory, but it may not be large enough
SMARTMATRIX_ALLOCATE_GFX_MONO_LAYER(scrollingLayer, kMatrixWidth, kMatrixHeight, 6 * 1024, 1, COLOR_DEPTH, kScrollingLayerOptions);
#else
SMARTMATRIX_ALLOCATE_SCROLLING_LAYER(scrollingLayer, kMatrixWidth, kMatrixHeight, COLOR_DEPTH, kScrollingLayerOptions);
#endif

SMARTMATRIX_ALLOCATE_INDEXED_LAYER(indexedLayer, kMatrixWidth, kMatrixHeight, COLOR_DEPTH, kIndexedLayerOptions);
//const int defaultBrightness = (100*255)/100;        // full (100%) brightness
const int defaultBrightness = (15 * 255) / 100;   // dim: 15% brightness
const int defaultScrollOffset = 6;
const rgb24 defaultBackgroundColor = {0, 0x00, 0x00};
const int y_offset = 2;

// Teensy 3.0 has the LED on pin 13
//const int ledPin = 13;

void drawBitmap(int16_t x, int16_t y, const gimp32x32bitmap* bitmap) {
  for (unsigned int i = 0; i < bitmap->height; i++) {
    for (unsigned int j = 0; j < bitmap->width; j++) {
      rgb24 pixel = { bitmap->pixel_data[(i * bitmap->width + j) * 3 + 0],
                      bitmap->pixel_data[(i * bitmap->width + j) * 3 + 1],
                      bitmap->pixel_data[(i * bitmap->width + j) * 3 + 2]
                    };

      backgroundLayer.drawPixel(x + j, y + i, pixel);
    }
  }
}
void setup() {
  // initialize the digital pin as an output.
  //pinMode(ledPin, OUTPUT);
  Serial.begin(115200);
  Serial3.begin(115200);
  Serial3.addMemoryForRead(buff,512);
  //delay(2000);
  Serial.println("Teensy 4.0");
  matrix.addLayer(&backgroundLayer);
  matrix.addLayer(&scrollingLayer);
  matrix.addLayer(&indexedLayer);
  matrix.begin();
  matrix.setBrightness(defaultBrightness);
  scrollingLayer.setOffsetFromTop(defaultScrollOffset);
  backgroundLayer.enableColorCorrection(true);
  backgroundLayer.fillScreen(defaultBackgroundColor);
  backgroundLayer.swapBuffers();
  drawBitmap(2, 2, &bmkg_ico);
  backgroundLayer.swapBuffers();


}
void loop() {
// clear screen
  //backgroundLayer.fillScreen(defaultBackgroundColor);
  //backgroundLayer.swapBuffers();
  backgroundLayer.drawLine(0, 0, matrix.getScreenWidth() - 1, 0, {0, 0xff, 0}); //top
  backgroundLayer.drawLine(0, matrix.getScreenHeight() - 1, matrix.getScreenWidth() - 1, matrix.getScreenHeight() - 1, {0, 0xff, 0}); //bottom
  backgroundLayer.drawLine(0, 0, 0, matrix.getScreenHeight() - 1, {0, 0xff, 0}); //left
  backgroundLayer.drawLine(matrix.getScreenWidth() - 1, 0, matrix.getScreenWidth() - 1, matrix.getScreenWidth() - 1, {0, 0xff, 0}); //right
  backgroundLayer.setFont(font5x7);
 backgroundLayer.drawString(480, 4 + y_offset, {0xff, 0xff, 0xff}, {0, 0, 0}, "Hello!");
  backgroundLayer.swapBuffers();
}
I have done all the ways to change refresh depth constant, but not solved it.
regards
emha